Jhokalups – Field Operation Action Report – 37
Jhokalups – Field Operation Action Report – 37
Jurisdictional Command of Tunguska vs Invincible Army
300/Asteroid Blues – Transmission Matrix
This week we tried another campaign night. Our local group has been all playing on the same scenario lately, so that we can all compare experiences and lessons when the game is over. We tried out the Asteroid Blues version of Transmission Matrix. This week I was paired up with RomanLegion who said “I want to play against someone with heavy hacking.” So that’s what we did. After we got our table set up we rolled our wip roll.
Wip Roll
Jurisdictional Command of Tunguska – 11
Invincible Army – 9
Decision: Jhokalups
Deployment: Jhokalups
Initiative: RomanLegion
1st Turn: RomanLegion
1st Deploy: RomanLegion
Invincible Army List:
 10
10 AB Transmission
──────────────────────────────────────────────────
GROUP 1

 10
10  1
1
SECURITATE Paramedic (MediKit) Combi Rifle / Pistol, Knife. (0 | 15)
SECURITATE Combi Rifle / Pistol, Knife. (0 | 13)
SECURITATE Combi Rifle / Pistol, Knife. (0 | 13)
GRENZER Combi Rifle + Light Flamethrower / Pistol, Breaker Pistol, Knife. (0 | 25)
PERSEUS FTO (Fireteam: Haris) Breaker Combi Rifle, Nanopulser, Smoke Grenades / 2 Pistols, DA CC Weapon. (0 | 33)
KRIZA BORAC Lieutenant HMG / Heavy Pistol, CC Weapon. (2 | 54)
MARY PROBLEMS Hacker (Forward Deployment L1) Submachine Gun + Zapper, Pitcher / Pistol, Knife. (0.5 | 30)
HECKLER Combi Rifle, Jammer, 1 FastPanda / Pistol, Knife. (0 | 23)
ZONDNAUT Hacker (Assault Hacking Device) Combi Rifle / Pistol, Knife. (0.5 | 31)

ZONDMATE Chain Rifle, Smoke Light Grenade Launcher / Electric Pulse. (5)
INTERVENTOR Hacker (Hacking Device Plus) Combi Rifle / Pistol, Knife. (0.5 | 25)


 2
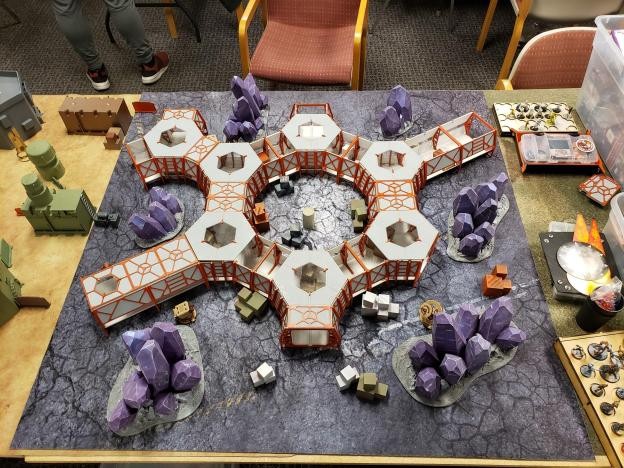
2 Our table used some terrain that our locals, (TheDiceAbide and White_Lang) have designed and made. We played with the sections in a small donut configuration, with the antenna in the middle only accessible by two ladders and going over the roof. There were some nice rocks on both sides. I chose deployment and having RomanLegion deploy first so that I would likely be able to go second, which has some nice advantages on this scenario.
I chose the side that is at the bottom of the picture below. In hindsight, I think that I probably chose the wrong side.

Deployment:
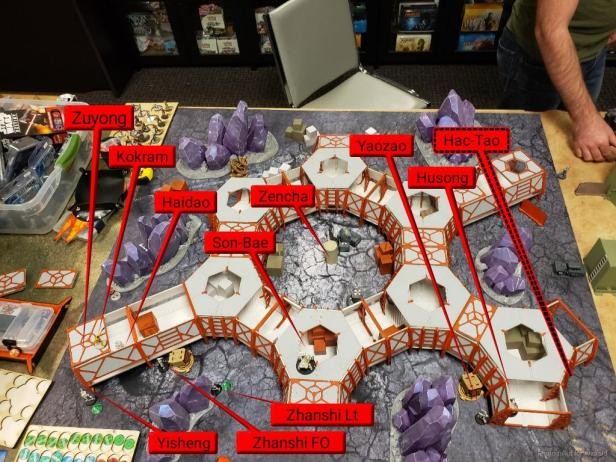
A missle bot in a Zhanshi core was deployed on top of the donut, in the center. The rest of the fire team was to the left on the ground level. Further left was the Zhanshi Yisheng. There was a Zuyong haris with Krit and a Haido in the tunnels on the left. On the right the Yishen’s helper Yaozao was hanging with the Husong TR bot. A Hac-Tao was in hidden deploy on the far right. The Zencha was a reserve camo marker that was dropped into the central transmission matrix area. The designated target was on the left behind some purple rocks.

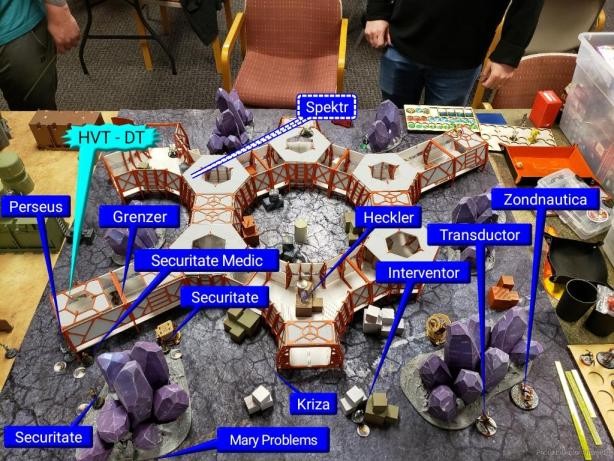
I set up my securitate link with Perseus and the Grenze on my left, guarding that Transmission area and the nearby Designated Target. I over infiltrated my Spektr to contest the far left Transmission Zone. I had Mary and the Interventor on my back edge and outside of the repeater network. My Heckler was inside the rings, ready to cover and approach. I had the Zondnautica and my Transductor Zond on the right side, behind the purple stones. Finally, I brought the Kriza in centrally, able to threaten some approaches from inside the ring.

Top of 1: RomanLegion IA
At the start of the game, I forgot to limit the use of Command Tokens on RomanLegion. I remembered after he talked about breaking Krit out of the link and then reforming it again. After breaking the Zuyong and Haidao out, the Haidao attempted a split Redrum at Mary and the Interventor. I responded with Lightning form Mary, Sucker Punch from the Interventor and Oblivion from the Zondnautica. The Haido makes it through all of these and takes out the Interventor. Another two orders and the Zondnautica and Mary go down to the Haido’s hacking. A TO marker reveals and slowly walks all the way across the map to be within a few inches of Persues. It reveals to be a Hac Tao and tries to take out my Persues, who successfully smokes. The Hac Tao then takes out my DT in close combat before reverting to a TO Camo marker. That done he passes the turn.
Bottom of 1: Jhokalups Tunguska
My first priority is to deal with the Hac Tao that is right by my link team. I spend a few orders to try and have the Grenzer discover, when that fails I have Perseus smoke out and attempt an intuitive attack on the Hac Tao. After the Hac Tao is revealed I walk Perseus in with the Grenzer moving nearby to attack with Martial Arts 3 against a change face, and take the Hac Tao off the table. After taking down the Hac Tao, I run my Transductor into the control zone on my right. I then use my remaining order to reveal my Spektr to surprise shot down the TR bot before ending my turn. WIth three zones to his two, I score this turn.
Score at the End of 1: 2 – 1 Tunguska Favor
Top of 2: RomanLegion IA
In order to deal with my Spektr, the Krit link team walks across the board. Krit on the rooftops and the others inside. On the way over Krit exchanges fire with Perseus. On their first exchange, Perseus deals a wound to Krit. After exchanging fire twice more, Krit manages to hit with both shots and Perseus goes down.

The odds seem to be in favor of Perseus winning that fight, alas, it was not meant to be. After taking out my myrmidon, the Haidao takes out my Spektr. Krit uses these orders to retreat down the side of the wall and pick up the TR bot. All done, RomanLegion passes his turn.
Bottom of 2: Jhokalups Tunguska
I start off with moving my Kriza over to a ladder, hoping to take out the missile bot and clear/capture the middle antenna. Unfortunately I fail a reset and BTS against the Zencha’s Oblivion. I then spend a few orders to bring my Grenzer, the Paramedic and another Securitate forward in another attempt to take out the missile bot, this goes awry and my Grenzer dies. Out of orders I end my turn. With three zones to my two, RomanLegion scores.
Score at the End of 2: 3 – 2 Invincible Army Favor
Top of 3: RomanLegion IA
The Haidao comes around and takes out my two forward securitate before Coup De Gras’ing my Spektr for the classified. With that done RomanLegion ended his turn.
Bottom of 3: Jhokalups Tunguska
I currently don’t have a lot of hope for the mission. Maybe if I get lucky I can take out the designated target and the Zencha with my Heckler. I spend orders to advance him forward and onto the roof, taking a shot at the Zencha, and losing my Heckler. With his classified done and another more zones scored, the final score is:
Final Score: 6 – 2 Invincible Army Minor Victory
Lessons Learned:
I think that this game was lost in deployment. The side I chose did not have any easy access to the roof. Additionally, I didn’t have a plan for the middle zone. It would have been better to put my Spektr in the middle zone, and focused on controlling that zone.
I am pleased with the usage I got out of Perseus. His ODD and fireteam link bonus can really push firefights in his favor. Even at bad ranes. Additionally, the mixed fire team and Stealth rules help Perseus push melee engagements into his favor as well. He is quickly becoming one of my favorite models.
Until next time.
