
It’s Tool Time!
By Clint Florka
This was submitted for Mission 022: Forward, Observer! — WiseKensai
I am in the middle of playing a Tabletop Simulator league run by VaulSC. This is his second one, and there are 5 rounds in 5 weeks, you can compose your list after you see the table and who your opponent is. This time the missions are all custom ones written by VaulSC. This mission seems based on Capture and Protect, and is mostly about getting to their side, grabbing a thing, and running back, but there is some secondary button-pushing (there are 2 antennas in the midfield) and killing a designated target in there as well.
Overview
- Mission: Recovery (VaulSC Custom Mission)
- Have Captured the Enemy Beacon at the end of ANY player turn (2 OP).
- Have Captured the Enemy Beacon at the end of the Game (2 OP).
- Have the Captured Enemy Beacon in your DZ at the end of the Game (1 OP).
- Prevent the enemy from Capturing your Beacon at the end of the Game (1 OP).
- To kill the Designated Target (1 OP).
- To kill the Designated Target with your DataTracker (1 OP).
- Connect the Antennas (1 OP for each Connected Antenna).
- Forces: Shasvastii versus O-12 (300)
- Deploy First: Shasvastii
- First Turn: Shasvastii
O-12 List:
O-12
GROUP 1 |10
1
GROUP 2 |
BETATROOPER Spitfire, 2 Nanopulser / Pistol, Knife. (2 | 41)
EPSILON HMG, Nanopulser / Pistol, Knife. (1.5 | 30)
ALPHA Lieutenant (Strategos L2) 2 Light Shotguns, 2 Nanopulsers / Pistol, DA CC Weapon. (0 | 26)
PEELER HMG / Electric Pulse. (1 | 26)
DAKINI Tacbot HMG / Electric Pulse. (1 | 21)
OKO Combi Rifle, Sniffer / Electric Pulse. (0 | 17)
VARANGIAN Light Shotgun, Chain Rifle, Smoke Grenades / Pistol, AP CC Weapon. (0 | 12)
KYTTÄ Flash Pulse, Sniffer / Electric Pulse. (0 | 8)
CYBERGHOSTS Hacker(Hacking Device Plus) Combi Rifle + Pitcher / Breaker Pistol, Electric Pulse. (0.5 | 26)
1
GANGBUSTER Combi Rifle + Light Riotstopper, MadTrap / Pistol, Knife. (0 | 23)
WARCOR (360º Visor) Flash Pulse / Stun Pistol, Knife. (0 | 3)
LAMBDA Engineer Combi Rifle, D-Charges / Pistol, Knife. (0 | 16)
YUDBOT Electric Pulse. (0 | 3)
6 SWC | 298 Points | Open in Infinity Army
Shasvastii List:
Shasvastii Expeditionary Force
SPHINX Spitfire, 2 Heavy Flamethrowers / EXP CCW. (2 | 106)

GWAILO Lieutenant (Multispectral Visor L2) Heavy Rocket Launcher / Breaker Pistol, Knife. (2 | 43)
M-DRONE FTO (Nanoscreen) Combi Rifle / Electric Pulse. (0 | 23)
NOCTIFER Missile Launcher / Assault Pistol, Knife. (1.5 | 32)
CALIBAN Engineer Submachine Gun, Pulzar, D-Charges / Pistol, Knife, CC Weapon. (0 | 28)
NOX Hacker (EI Hacking Device) Submachine Gun, Zapper / Pistol, Knife. (0.5 | 17)
IKADRON (Baggage, Repeater) 2 Light Flamethrowers, Flash Pulse / Pistol, Electric Pulse. (0 | 9)
R-DRONE Flash Pulse, Sniffer / Electric Pulse. (0 | 8)
I wanted to run the Sphinx, so she is in there, as well as an Engineer. I prefer the Caliban over Dr. Worm, since it can start much further up the board, where the Sphinx is going to have an easier time running back to. I know O-12 has smoke and plenty of visual mods, as well as easy access to MSV, so the MSV/Albedo on the Gwailo was there to back up the Sphinx against any Epsilons that might be holding down the table. Also, it’s in a fireteam with M-Drone FTOs, my primary button pushers. The table has pretty long firelanes, so a Noctifer was a must, and I tossed a Nox Hacker in to be a backup button pusher and/or potentally get some hacking done through either the M-Drones once they advanced or the Ikadrons/R-Drone once the enemy approached my beacon.
My list *really* wanted it, so I opted to take first turn when we rolled WIPsies. He picked the red table edge, which has a great ARO spot, with 3 really long firelanes, I think mainly to stop me from having it, since he didn’t use it.
Deployment
Shasvastii Deployment:
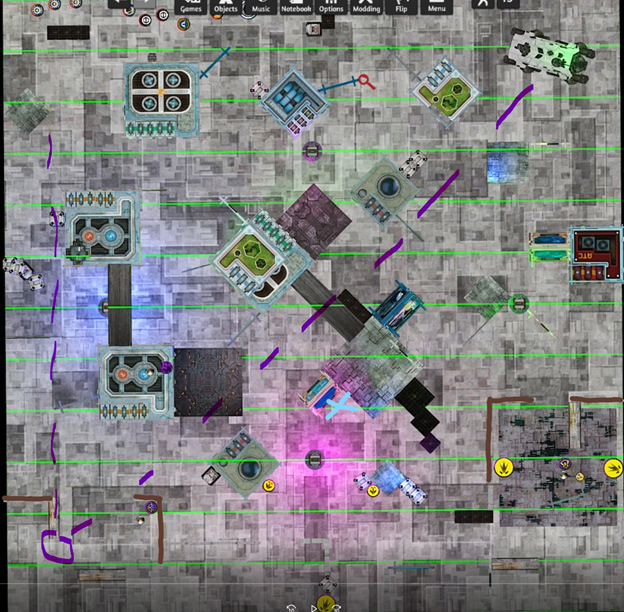
Deployed my Gwailo and M-Drone fireteam off to the right, pressed pretty far forward, depending on their Nanoscreens for cover, ready to jump on the right antenna. I had both Ikadrons and the R-Drone covering the beacon in the middle, and I placed my Caliban on a roof on the left, with my Nox Hacker tucked behind some walls. My Noctifer was at the bottom right corner of the map, looking down a long diagonal lane, as well as one straight towards his deployment zone. Forgot about HVT until it was his turn to deploy, but it was just forward of the beacon, and to the right, in a nice corner.
Can you get into your opponent’s head and talk about why they deployed the way they did? This is a really good learning exercise too…
(Purple is Noctifer with fire lanes, blue X is HVT location, brown marks are to mark some walls that are hard to see, green lines are every 4” in TSS, very helpful for deployment)
O-12 Deployment:
He put his Alpha hidden in the upper-right, with a Varangian Guard right next to him, and an Oko Copperbot slightly ahead of that with a Yudbot. Obviously defending his telegraphed Lieutenant. Slightly further to the left, he had a HD+ Cyberghost behind a building, and in the center was a Gangbuster KHD with his MadTraps, guarding his beacon. A second Gangbuster (combi profile) was using his MadTraps to protect his HVT on the far right, behind the building.
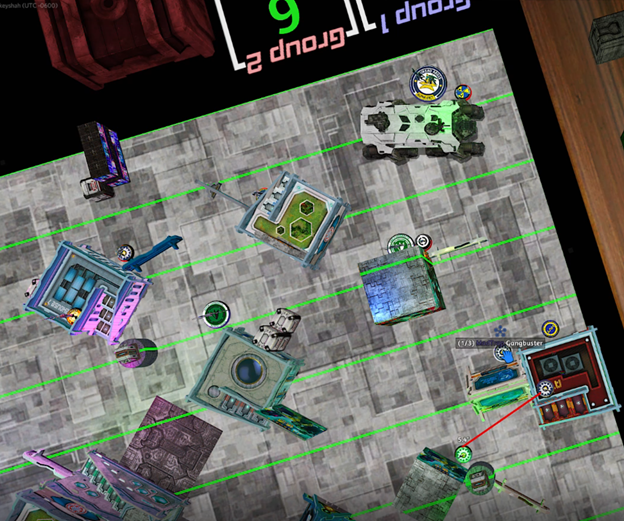
On the left he placed his Kytta bot, his second Varangian pushed as far forward as he can go, a Peeler bot up on roof with another Yudbot, the Lambda Engineer that both Yudbots were attached to, and an Epsilon HMG behind the building, hanging out with a Mad Trap from the KHD Gangbuster.
My reserve was the Sphinx, which I put off to the left as a TO Camo marker, behind a building and on the forward edge of my deployment zone. I put it in marker state (instead of hidden) to take advantage of the Tactical Awareness order on my first turn.
His reserves were an HMG Dakini, which went down next to his deployment zone Gangbuster, and a Spitfire Betatrooper, which went up on the roof with the TR bot and the Yudbot. My datatracker was my only option, the Gwailo, and his was his Betatrooper.
Turn 1
Top of 1 – Shasvastii
I started by using a few orders to run the Sphinx down the left side, managing to take out his WarCor, the Flashpulse bot, and his TR bot. His Varangian Guard was a target, also, but it had saved itself by throwing smoke at his feet and passing both flamer saves. I ended up getting too close to his MadTrap, though, and got glued.
With my main piece in trouble, I sent the Caliban Engineer after it, getting discovered by his Oko Copperbot in the process (he was in bad range band and had to deal with Camo, but the +6 Discover they get from having Sensor really make their discovers cover the whole board pretty effectively), and managed to unglue the Sphinx.
A few orders later, and the Epsilon and Lambda were down, and my Sphinx was re-camo’d. Unfortunately, the Caliban was quite exposed.
It was a pretty successful turn for having been glued down for part of it. Took out 5 of his orders and had the Sphinx Camo’d up and tucked away on his left side. Could’ve been much better if I had paid more attention to his MadTrap, though.
Bottom of 1 – O-12
He spent a couple command tokens to keep his main group filled, leaving only a Varangian in the other one. He opted to not use his impetuous orders, since his Varangian Guard on the right was where he wanted, protecting his Alpha, and his left-most would just get into CC with my Caliban and provoke an ARO from the Sphinx.
He moved the central Gangbuster towards the Caliban, shocked it off the table, and put the remaining MadTrap into Standby within ZoC of my Sphinx. He then used his solitary Group 2 Varangian to attempt a discover on my Sphinx, and failed. The Gangbuster successfully discovered the Sphinx, though, which allowed his Betatrooper a chance to start shooting at it from behind.
I think this might’ve been a mistake. The Betatrooper was safe, since he was firing into my backarc, but it was in 0 rangeband for the Spitfire, and -6 for TO Camo. His Gangbuster had MSV1, and was in good range with the SMG, which has AP ammo. In any case, he spent a few orders missing with the spitfire, and another trying to use the dual nanopulsers, which finally allowed my Sphinx to fail guts back a little, improving his LoF to see all his current threats. His last two orders were spent moving his flashpulse bot into ZoC and trying to hack with his Cyberghost. Oblivion hit, but I passed the BTS save.
I got pretty lucky here. He took out my Caliban, but also spent 7 orders on the Sphinx without doing anything other than revealing it.
Turn 2
Top of 2 – Shasvastii
My Sphinx was pretty locked down, being in LoF to a Betatrooper, a Varangian, and a Gangbuster, while being in ZoC of a flashbot repeater. So I took the Gwailo Haris out to play. Unfortunately, MadTrap snagged one of the M-Drones on its first order. Luckily, I had a second one, whom I used to flip the right antenna. I then threw him into the other MadTrap’s ZoC and tried to at least Dodge this time. Dodge failed, but I managed to roll a 1 on the PH check. Now that those were out of the way, I started towards the Designated Target, and took it out with my Gwailo. Also tried to take on the Oko FO bot, but got Stunned for the trouble. Fell back a little and spent a command token to re-form my Haris (they had gotten out of coherency quite early on, due to the glued M-Drone).
I didn’t manage to touch his order pool, but I accomplished a mission objective, and cleared some MadTraps out. I intentionally left my Gwailo exposed for AROs, but I had forgotten about…
Bottom of 2 – O-12
White Noise. I had forgotten about White Noise. First thing he did was throw it down with the HD+ Cyberghost. He then put Enhanced Reaction on the HD Dakini. 1 more order and the Dakini took my Gwailo down in one volley.
The Dakini then went after the Sphinx, but the Sphinx tied the f2f, while my M-Drone successfully flashpulsed him. His Betatrooper tried Nanopulsering again, and successfully did a wound, but the flame it got in return burned it off the board. He makes another attempt at Isolating the Sphinx, this time succeeding. He also moved the Kytta behind my Sphinx.
He lost his Betatrooper in the active turn, but successfully Isolated my Sphinx and took out my Gwailo Lt.
Turn 3
Top of 3 – Shasvastii
So, it’s my last turn, and I’m in Loss of Lieutenant. I probably should’ve left the Sphinx alone, but it was there and it had 2 orders it could use, so I thought I’d try. This meant my first short skill provoked the following AROs: Flashpulse from the Kytta, hacking from Cyberghost through the Kytta’s repeater, MadTrap boost, Varangian Guard chain rifle, and an SMG shot from the Gangbuster. I then laid down the double flamers on the Varangian and the Gangbuster. Killed the Varangian, but my Sphinx was glued again by the MadTrap. Welp, I tried. (Again, probably shouldn’t’ve, but it’s hard not to.) In any case, the rest of the turn was just shuffling guys to better guard things. Notably, my M-Drone was centrally located and in suppressive fire by the end of the turn.
Bottom of 3 – O-12
He finally decided to use an impetuous order to move the Varangian forward a little and try to set up smoke for his Oko bot. It didn’t work the first time but he got it on the second. He spent a couple orders on the left side of the field, on the Gangbuster KHD, trying to get to the left antenna. I revealed my Noctifer, who took a shot and ended up missing, but that stopped the Gangbuster, as Missile Launcher severely outranged the Gangbuster’s SMG. He moved his Oko through the smoke he set up to get closer to the Dakini and put Enhanced Reaction back on it. The Dakini then went to fight the M-Drone. M-Drone held out for a little, which is all I could ask of it. In a last ditch effort to hit the right console, he sprinted the Oko across the diagonal firelane the Noctifer was covering. This gave me a free shot, which ended up taking out the poor FO bot. He had one more order left, but nothing to do with it, so it ended as a
4-1 Shasvastii Victory!
Post Game Analysis
Overall, this was a fun game. Anytime you get to run around with a TAG, and it works out, it’s fun. I do look forward to N4 when Imm-A (which is replacing Imm-2) can be Dodged out of (albeit at a PH-6). Makes N4 Para ammo weaker than N3 Adh, but I’m ok with that. Not sure it would’ve changed much this game, except I probably wouldn’t’ve exposed my Caliban.
Gwailo didn’t do as much work as I normally like him to do, but he was up against White Noise, which was my bad for forgetting about. You live you learn. Noctifer did do his job, however, in the final hour, stopping both his KHD Gangbuster and his Oko FO bot from pushing buttons.
Speaking of FO bots, one of mine got glued before it could go to far, but the other did some serious work. I really like the M-Drone/Gwailo Haris, as the Gwailo is a great gun platform, and the M-Drone is a great toolbox. The FTO Nanoscreen upgrade is definitely worth the points (and required for the Haris). I didn’t get a chance to use the more unique stuff it has (i.e. Sensor), but only because my opponent’s list didn’t have any Camo. The M-Drone still flipped a switch, took out a MadTrap, stunned the Dakini HMG, and slowed down enemy troopers when that’s what I needed. It’s a specialist, with Sensor, Forward Observer, a repeater, a gun with Suppressive Fire, and a flashpulse. A great toolbox indeed.