Battlereport (Druze vs. Steel Phalanx)
Eric
Overview
Short Preface: As my friend and I do not play too regularly we prefer 200 points games for now. We played a mission of Supplies as described in the rule book using a 48“ square map as we only found those in TTS.
- Mission: Domination (Rulebook)
- Forces: Druze versus Steel Phalanx (200)
- Deploy First: Druze
- First Turn: Steel Phalanx
I won the initiative roll and took second turn as this is so strong in this mission I decided to go second.

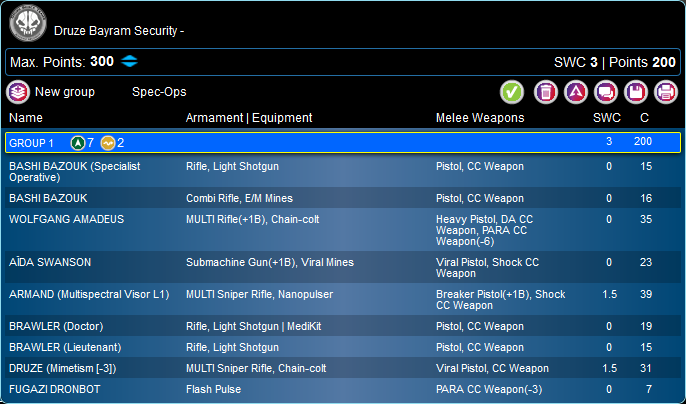
All games in N4 I did with Druze so far. Hence, I decided for the fifth game to play a rather random list. It turned out to be heavy on snipers and AD for Druze standards. One Bashi as specialist for possible button pushing and one for skirmishing and possible EM shenanigans. Then, I decided to give Armand a try as I usually disregard him. As a main piece I wanted to try Wolfgang Amadeus in a link and as long range I added a Druze sniper as the HMG did not strike me the last games lacking some sort of Mimetism. The Doctor is for specialist duties and to keep the link runing. Additionally, I took Aida to be able to deploy in both close quadrants and to have a bruiser on the other side of the table than the link. The remaining points needed to get a lieutenant in the list and add orders.

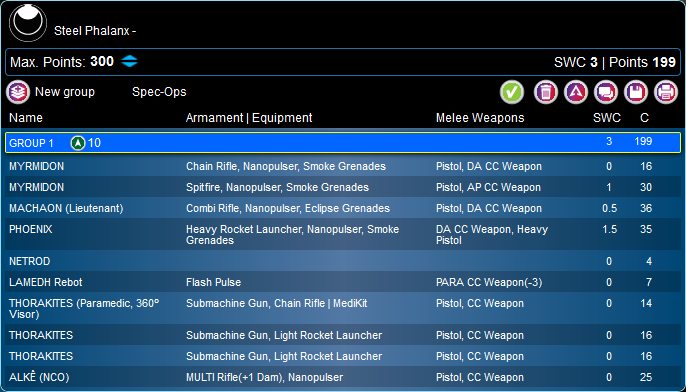
It was my enemies first game of N4 with Steel Phalanx. In the past he had bad experience with small order count so he tried to get a solid 10 order list with two links.
Deployment
My opponent chose a side and I had to deploy first. He didn’t know which side to pick. His choice ended up shaping the further game as the building on the lower edge just before my deployment zone was one of the highest buildings on the map (the other being the central building). I‘m not sure there are many other proper snipers except Armand and the Posthuman that can take advantage of building outside the DZ. Unluckily for him I had one of them. I hold him back and put Aida on one side and the link on the other. As I knew Armand would be close to the lower edge I put the Fugazi somewhere on the upper half. Aida was put into suppressive fire.
My opponent started with the Netrod failing the PH check. Well, never mind in N4. Then, he spread his links, putting one on top of a building as he was going first anyway, another mistake. He held Phoenix back, which did not really give him a chance to react to Armands deployment.
Note: In the picture below I marked the consoles with red dots, Nessy, Phoenix and the Spitfire Myrmidon got red borders as the SP symbols are hard to differentiate otherwise.
Turn 1
Top of 1 – Steel Phalanx first turn
As Armand had a good view on the Thorakitai they had to wait until he was supposed to be dislodged. Phoenix stepped around the corner raining fire rockets on the cabbage sniper. Three dice on 7s vs one dice on 7: I rolled an 8… When I was picking the remainder of the board I recognized that I was actually rolling on 10s due to MSV1. So, back to zero – phoenix got a wound and he dropped unconscious to be able to be doctored without provoking AROs. Reborn from the ashes phoenix fired again and got critted, dropping to the dead. This crit totally shaped the game as my opponent had a hard time to handle Armand now. At least Machaon dropped eclipse smoke so both links could advance in the upper quadrant. The revengeful Myrmidons decided to battle Aida. Afraid of being in -3 range band I decided to dodge but actually they were in 15“. Oh, well. Aida did not dodge going into embryo state. The Thorakitai killed the Fugazi and advanced.
Bottom of 1 – Druze first turn
With nothing to act with in the upper half I decided to move up the link and discovered a nice fire line for the Druze sniper (let‘s call him Jethro for convenience) against the thorakitai. A Wise Kensei once told me that sniper in the midfield might yield a powerful tool against the other table half …
First I cleared the way with Armand against the FP bot. Then, Jethro advanced with his team. Running low on orders I did not activate the console. In cover of the two containers in the lower half jethro took aim for the thorakitai link. Nessy managed to dodge while the paramedic and one of the rocket launchers. Sadly, at that point I was already running out of orders.
Both of us scored 1 point as each of us controlled two quadrants.
Turn 2
Top of 2 – Steel Phalanx
The Myrmidon link took action again, wounding the Druze sniper and with a second order killing him and the embryo. Then, Machaon headed for the console in the upper right quadrant, gaining access in no time. With just a small number of orders to go my opponent decided to leave the myrmidons in place, not to give me good shots. Instead, the Thorakitai advanced to protect the upper left quadrant.
Bottom of 2 – Druze
Now, with just four regular orders I decided that it was time to drop something in the upper half. Luckily, Bashi Bazouk do not need to decide for an edge at deployment anymore. This gives them a lot of flexibility. Sadly, The thorakitai and myrmidons protected most of the upper edge. I decided to drop the specialist first, hoping to clear a way for the second bashi isolating Machaon who was now obvious to be the lieutenant. He dropped close to my DZ behind the building on the upper edge and advanced to shoot the Thorakitai, the first dropping to surprise attack. With his last order he managed to trade his life for Nessy‘s. With just the order to land the second I put him again in the same place being slightly outside my DZ. That scored me 2 objective points.
Turn 3
Top of 3 – Steel Phalanx
With not many options my opponent spread his link trying get a draw out of the game.
Bottom of 3 – Druze
The brawler doc moved to the lower left console hacking it. With Amadeus following like a loyal doggy they already dominated Machaon. With my last orders the bashi tried his luck again the chain rifle myrmidon, killing him.
Hence, it turned out as
Druze 6 – 2 Steel Phalanx
Druze victory
Post Game Analysis
In such small games Mimetism -6 is very powerful as there are not many counters usually. Beating Steel Phalanx in this regard made my day. But Armands performance at the very beginning totally dictated the game as he didn‘t leave much space to my opponent. Coupled with the two Bashi that gave me solid options to score. But, I guess if Armand would have died as expected at first, then going against the myrmidons would have been hard for me. So it was a lucky game. Maybe, my opponent should have tried to go heavier on Armand, well … But the Bashi bazouk also did a solid performance against the thorakitai. Their flexibility gives Druze another midfield option next to Hunzakut and Peacemakers. Especially in a mission like Domination having a couple of points to drop somewhere is great. Sadly, there is no true AD in Druze…


Pingback: Mission 027 Report: Maximum Diplomacy – Bromad Academy
Great to see such a nice performance of DBS, especially against Steel Phalanx! The second Bashi may be a bit redundant, but that may be a habit from N3. Your core-team sounds quite interesting, since it stays strong a long time, is always dangerous to engage and has some serious potential by slingshotting Wolfgang into the midfield in turn two or three.
So keep going with the good work!