The Highland Brawl
By TrashPander
Overview
- Mission: The Brawl
- Forces: <Vanilla Ariadna> versus <OCF> (300)
- Deploy First: <OCF> (Jono)
- First Turn: <Ariadna> (Kev)
Editor’s note: I’ve made this a BAMS v0.1 mission, with heavy edits. You can find the versions here:
Trashpander (Kev)
So not only am I trying a new game mode I’m also trying out an Ariadnan guided spam list.
Missile bots and a tonne of forward observers to try and activate them. Simple, Silly and hopefully a tonne of fun.
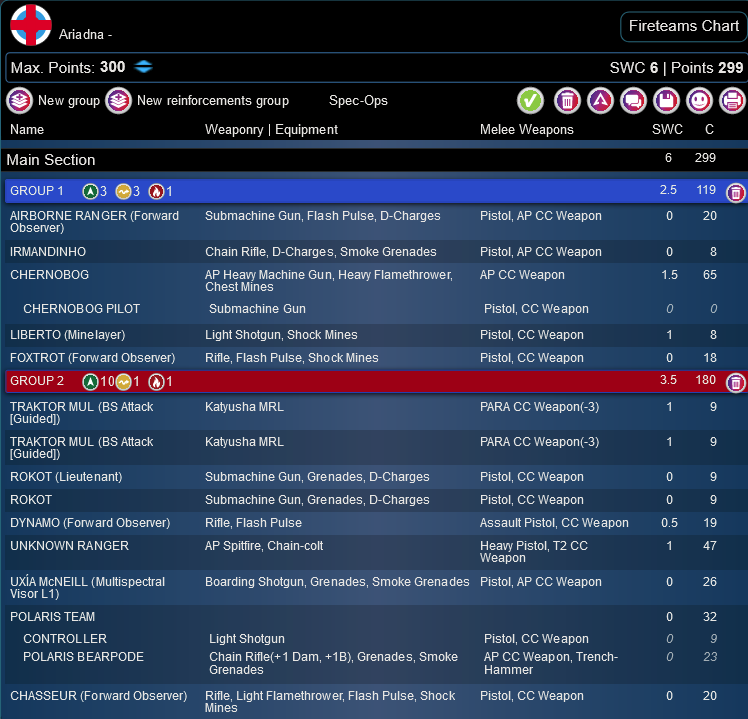
PirateBrushes (Jono)
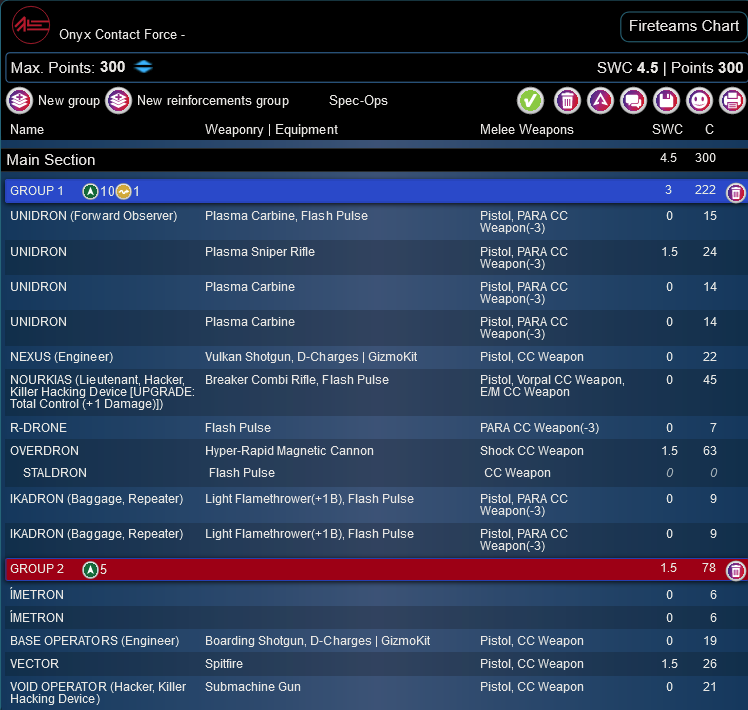
(This is an approximation of the list from memory)
The Brawl
So in preparation for The Highland Brawl our growing infinity tournament scene In Scotland I wanted to try out the custom mission I put together for it. My friend Jono was of course happy to oblige. Its my own twist on engideck mission with the theme of brawling in the center armory to the adoring fans its being broadcast to. That’s partly the reason I made the design choice to give a bonus to Engineers and FO’s to boop buttons. They know how the kit works and to get the best shots of the action that are probably a little biased…
The actual technical idea of this game mode was to make taking the armory and second turn a more difficult decision. You gain a full 2 points in the mission if you score more total model removals from inside the armory if your model is also in there at the time. My hope is to encourage the fun CQB elements of infinity.
One addendum I will make to the scoring is that one player never pushes anything into the armory they will forfeit the 2 points to the player that takes it as I don’t like the idea of being able to withhold the points from another player.
Deployment
Now unfortunately our local game store is in an infinity terrain deficit so we really had to make do with what we had, which was a hodgepodge of other systems and things I could grab from terrain boxes that weren’t being used.
Apologies I still forget to take the good action shots!Jono won the roll off and chose to take second turn against a vanilla Ariadna list. I feel like you need to have a strong defensive list, msv, linked shooters or other shenanigans at your disposal or they present the option of just running you right over. Now that I’m taking deployment advantage and the first turn it puts me in a really strong position.
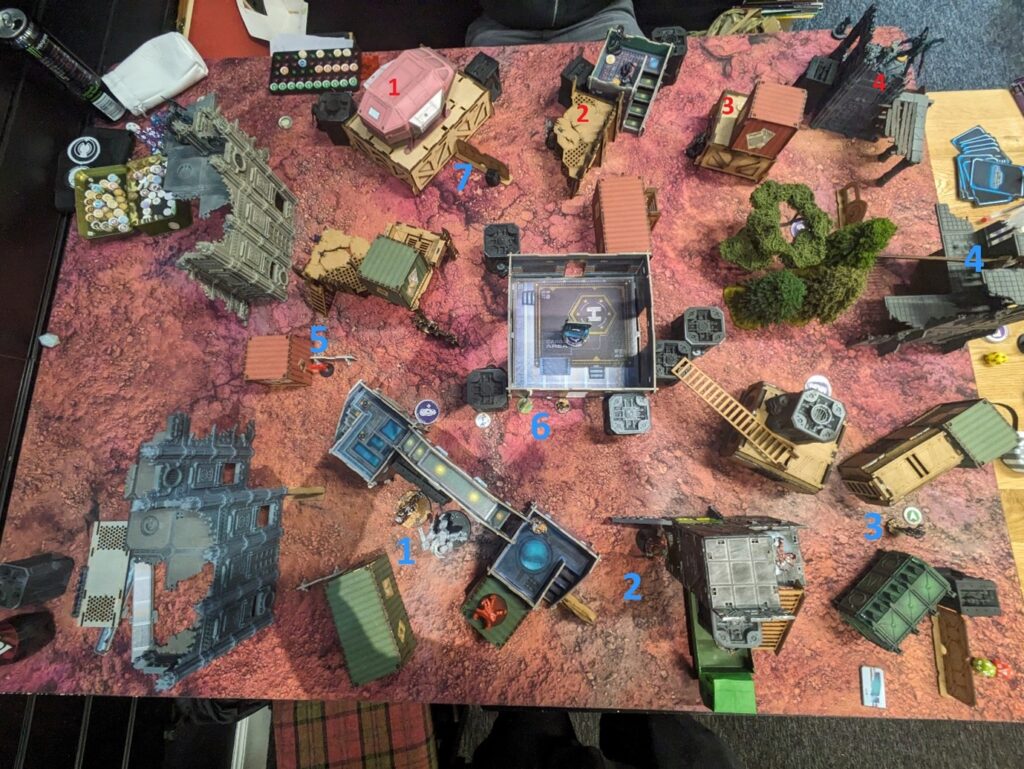
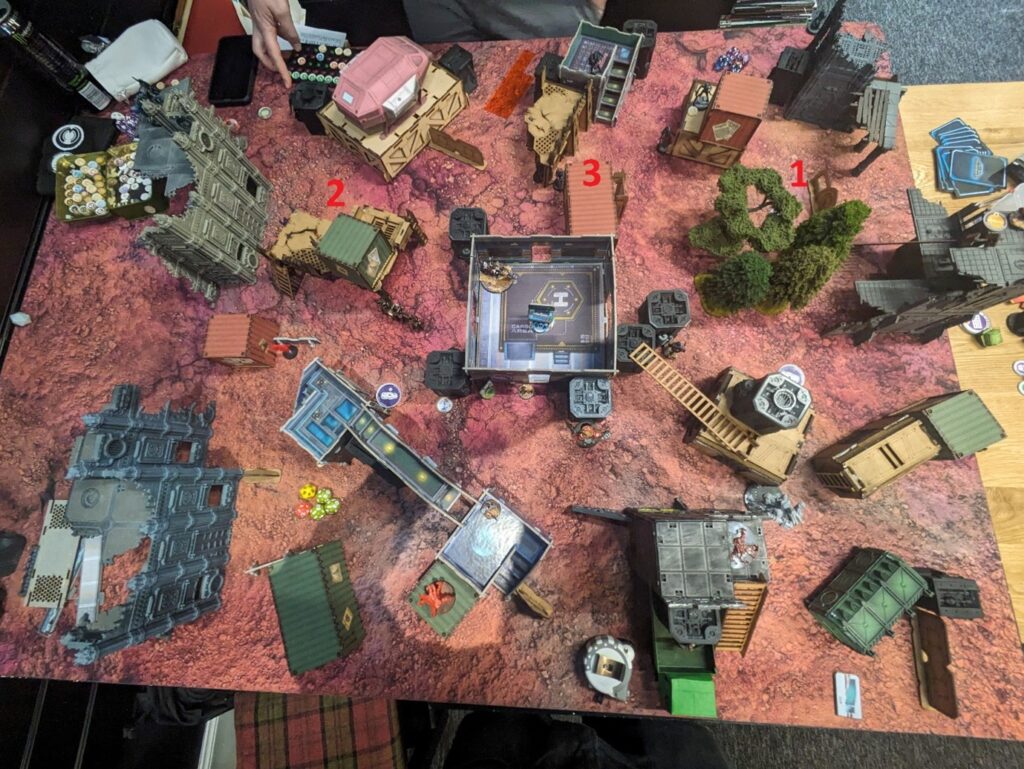
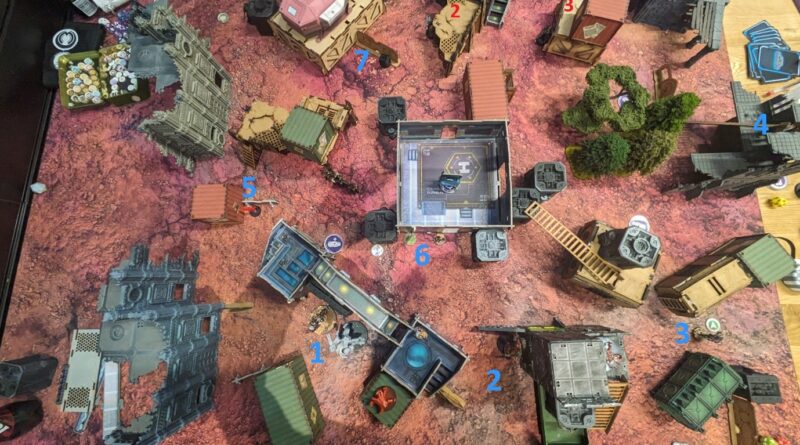
- On the Far left Position 1 – We have Nourkias, an ikadron and a flash pulse bot tucked away. Behind the spaceship the flash pulse bot as a bead into my have of the table
- Position 2 – is a classic unidron link team with that incredible plasma sniper
- Position 3 – two of the exrah harris are there, one behind the red cargo container on the roof and the spitfire on the ground. To the left is another ikadron
- Position 4 – tucked beside the overdron is the third member of the exrah fireteam.
The Overdron at position 4 was Jonos reserve model
Centre room was infinite height so helped to hide a lot of the table
I picked my side of the table to deny use of the buildings to the left and right of position 2 on my side of the field. Having a shooter being able to walk along that bridge and remain in cover while getting good angles across the board is something I would like to avoid while the other building on the right is tall enough to hide large models behind.
- Position 1- Dynamo and the Chernobog but the cherno does not go down until after the Overdron goes down.
- Position 2 – Bear and the irmandihno ready to move straight into the room.
- Position 3 – UKR deployed out of cover at the very edge of my deployment zone. Normally not a good practice but I know I have the order to spend on him and leaving him out as a bit of bait for whatever is about to land is potentially a good exchange. I can also just smoke him if I need to.
- Position 4 – I place the chasseur at the very top of the ruined building in hopes of getting some FO shots off
- Position 5 – Mirroring with a foxtrot FO to keep a good field of view across the table
- Position 6 – Dropping the liberto and his mine at the edge of the armoury ready to dodge in and drop templates or go on a suicide run
- Position 7 – Over-infiltrating Uxia I drop her right in front of the Unidron link ready to exchange templates
- Jono then drops his overdron on top of the building to the right on position 4
We talked about this for a bit after the game. Normally dropping tags on top of a building is a mistake. They can’t go prone and can’t dodge/guts out of LOS. However, what I had deployed which was everything but the chernobog meant I really didn’t have a strong answer for dealing with it. UKR could fight it and be in a good position to do so as we were counting the trees as a low vis zone but it would still take a few orders to do so even with that advantage.
If the table was flipped I think I would put it around position 3 so that I could tuck it back away and potentially contest the bear if it wanted to move out into lof.
Booty on the irmandihno nets me an explosive CCW. You can’t win them all!
Before the game I drew telemetry and another card I don’t remember as I couldn’t do either of them so just grabbed whatever and resigned to secure hvt instead.
Turn 1
Top of 1 – Trashpander (Kev)
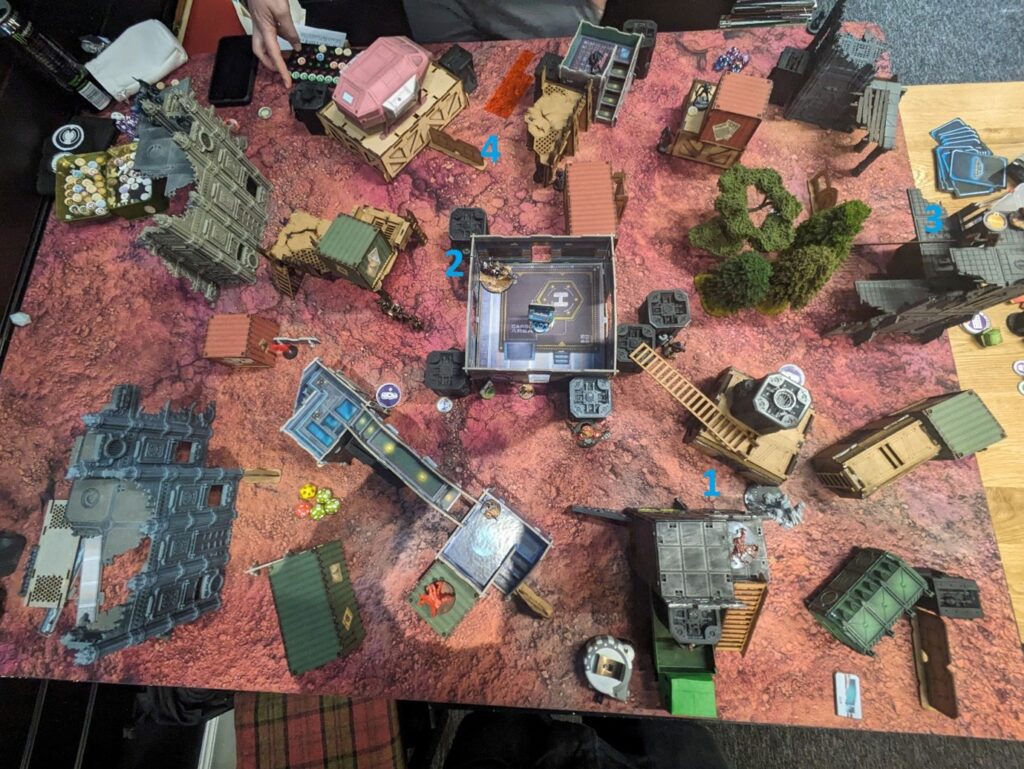
Jono takes two orders from my main pool, but I think in this specific instance removing them from the chernobogs pool would have been a good potential strategy. I could still run the bear wild but all his AROs would have been intact to slow it down. Tough choice as the bear can do an incredible amount of damage with a handful of orders if left uncontested.
I choose to not use the impetuous orders on the irmandihno as it would move past the Overdrons LOF
Dynamo double moves with its impetuous order and gets in position to lob some mines.
1 – Chernobog starts its lumbering advance putting down the flash pulse bot at the back left of jonos deployment zone before moving into position to get an angle on the Overdron I think the first order knocks a wound off then the second I get 2 hits and a crit and knock it to unconsciousness.
At this point the dynamo pushes forward and drops a mine right in front of the link team.
Then swinging around with very limited orders left in the second pool I have to flip one irregular over and put 4 shots into the unidron, Jono can’t use the template of the plasma as it would come into contact with my HVT and I choose to just tank the ikadrons flash pulse and thankfully pass the BTS saves. The mine also goes off and the one member of the link team dodges breaking the 5 man link into a 4 man. I win the exchange and Jono chooses to drop the Unidron into unconscious and not dogged.
I’m flipping back and forth if this was the right choice. I could flip the last irregular order on the cherno and potentially gun it down, but it also holds a dominant ARO position.
now that I can get into the armoury pretty much uncontested the shift of the battle will focus inside this zone and the sniper becomes less relevant in its current position
2 – The dynamo spends three orders first to drop mine in front of the Unidron link as described above beside uxia, opens the door to the armoury and boops the centre button netting me 1 objective point.
3 – Now the overdron and an exrah are in position for a cheeky missile strike I move the chasseur up prone to the edge of the building and FO the overdron grabbing me telemetry. Next I co-ordinate the two Katyushas, bear, and UKR as the spearhead. I move the latter two into slightly better positions and the missiles manage to both completely remove the overdron and the exrah there. Great, I did the thing I wanted to do.
4 – Uxia then gun fights the Unidron in front of her putting it to dogged. I move uxia back to attempt a run at an objective, but the Unidron sneaks a crit through, and I lose her.
I dropped the airborne ranger in at the base of the building under the chasseur but this was a mistake as he didn’t really have anything to do for the rest of the game.
Bottom of 1 – PirateBrushes (jono)
- Jono uses the spitfire exrah to kill my chasseur. My memories a little hazy here but I think there is then an exchange of fire between the exrah and UKR but nothing happens
- Nourkias moves up freely and boops the button in front of him and tries to tuck into cover
- Spends some orders getting his Plasma sniper backup and into the fight then moving the link team into position for a next turn armoury strike
That is unfortunately all he can achieve this turn as I’m fairly spread out and overextending anything is asking for trouble
Turn 2
Top of 2 – Trashpander (Kev)
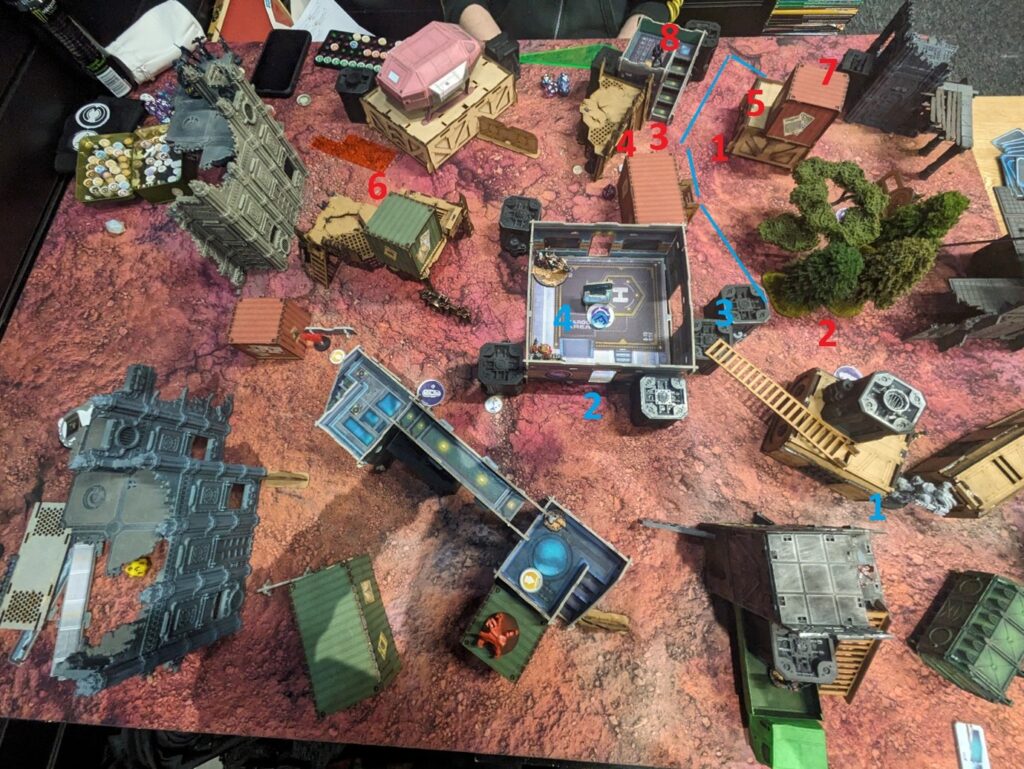
1 – chernobog advances killing the Unidron outright this time with another Crit and a few hits
2 – Irmandihno moves up into the room but gets beaten in the smoke exchange with a plasma round. Liberto goes in next, breaking the link by forcing a dodge and a shot back but dies with a plasma round.
“ready to comply ” My converted UKR winter soldier does what he does best and goes on a rampage killing the ikadron (1). failing to push the button as is tradition (2). then pushing up the table kills another unidron (3). Guns down the nexus behind the red container (4). Climbs the ladder to kill a prone exrah taking a template but tanking the hit (5). then puts a wound on nourkias who manages to tuck in by failing guts (6). then sneaks around to kill the spitfire exrah (7). Finally, he puts two shots into each imetron (8) removing them from the game too.
No Buttons for the winter soldier, only Violence.
I love this wee conversion, but I really need to brush up (pun intended) on my painting.
Bear moves into the room to contest nourkias if he makes a run on the room
Bottom of 2 – PirateBrushes (jono)
By this point all that’s left of jonos list is nourkias on NWI and the ikadron batroid that could really contest the room, so we end the game after some shuffling around as we needed to pack up at this point anyway.
Post Game Analysis
I scored
Secure HVT 1
Telemetry 1
Held the room for two turns 2
Booped the centre console first 1
Same number of consoles activated 1
Jono Score
Same Number of consoles activated 1
6-1 To Ariadna!
The co-ordinated guided strike, you love to see it. Only managed to get it off once in this list as I fell back into old crutches of the cherno/ukr rampage that continues to be so strong.
The idea of this list was to give my specialists who can really get anywhere on the board some teeth. Mixed with a bear and a ukr in a co-ordinated order you have a horrible decision to make. Fight the ukr? Let the bear advance? Tank potentially 2 katyusha missiles?
It’s all bad decisions really if you can get it off on the right target and that was the strategy I wanted to explore.
I’ve been using the bear less and less in an active fashion nowadays with the inclusion of the chernobog and moved to a slightly passive strategy with it. Deployed first it almost forces a response from the opponent then you just drop the chernobog down to counter. The only time I’ve really been using it is to run into a link team to drown it in violence if its order efficient to do so. (which it normally is) I weigh this up in my own head how many potential objectives can I complete in turn 1 with the UKR/Cherno combo compared to the order efficient damage I can do with a bear. As I mentioned before the bear doesn’t need to go off turn one it can do so much damage in later turns I tend to get more value out of it at that stage as you can prime it with a move order/co-ordinated order here or there.
I’m happy with the mission. It’s a little awkward getting my point across on it but it’s really just to have fun smashing models together in a tight spot, I feel like it could use some fine tuning.
Jono won the roll here and chose to go second which for this mission I think is a mistake. There are so many other options to the scoring it doesn’t swing as wildly as armoury does and letting vanilla Ariadna see exactly where you deploy and get the first turn puts you at substantial disadvantage no matter how points are scored.
I should have kept the airborne ranger back another turn and placed him at the opposite side of the field or maybe even just switched him out for an SAS. I feel like the small group needs that extra order. This is by no means a good list imo. Just trying to get the theme of it to work and a 9pt 1swc katyuhsa is by no means a horrible spend when it force multiplies some very efficient units like the SAS FO, Paracommando FO and the Dynamo FO.
Turning the tables again I think I would have chosen to go first to bring that HRMC online as early as possible. albedo and an actual gun to use it for a change is scary. I even like to take armand from time to time and he would have chewed through him eventually.
Jonos list.
I continue to not be a fan of the one wound 20+ point harris teams. Exrah are even more finnicky with just dying outright and everything nowadays seems to have a template weapon. 1+ burst sounds good in practice and if you can get it on something cheap or brings something extra to the team it can work like say the UKR – Patcher – Varangian or the UKR – Rokot Paramedic – Wardriver I use for HC and CM.
These teams contain all the elements you need for success in a harris. Whether that’s smoke. cheap specialists the ukr can’t do or you know a burst 4 vulkan shotgun!
That’s more a statement of how well a kosmoflot list builds over OCF though, you can have your cake and eat it too with a harris, core, UKR, bears, uxia, sas without really sacrificing anything from that list.
I think it just needs another wildcard element to it. Either a fraacta, malignos or a noctifier something to take back momentum in the objectives or killing game when you need it.
Hope you enjoyed reading this as much as I did writing it as I love to ramble about all things Ariadna and if you have any question hit me up on Discord!

Pingback: Mission 059: Try Something New Report! – Bromad Academy