Almost full points; but not quite!
By RandomCallsign AKA Gus
Overview
- Mission: Cryogenics
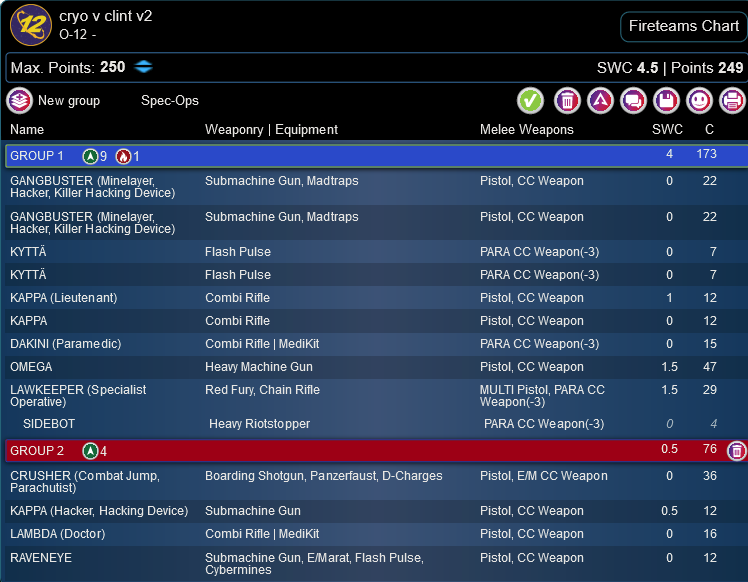
- Forces: 0-12 v Bakunin (250)
- Deploy First: Bakunin
- First Turn: Bakunin
Deployment
O-12 Deployment
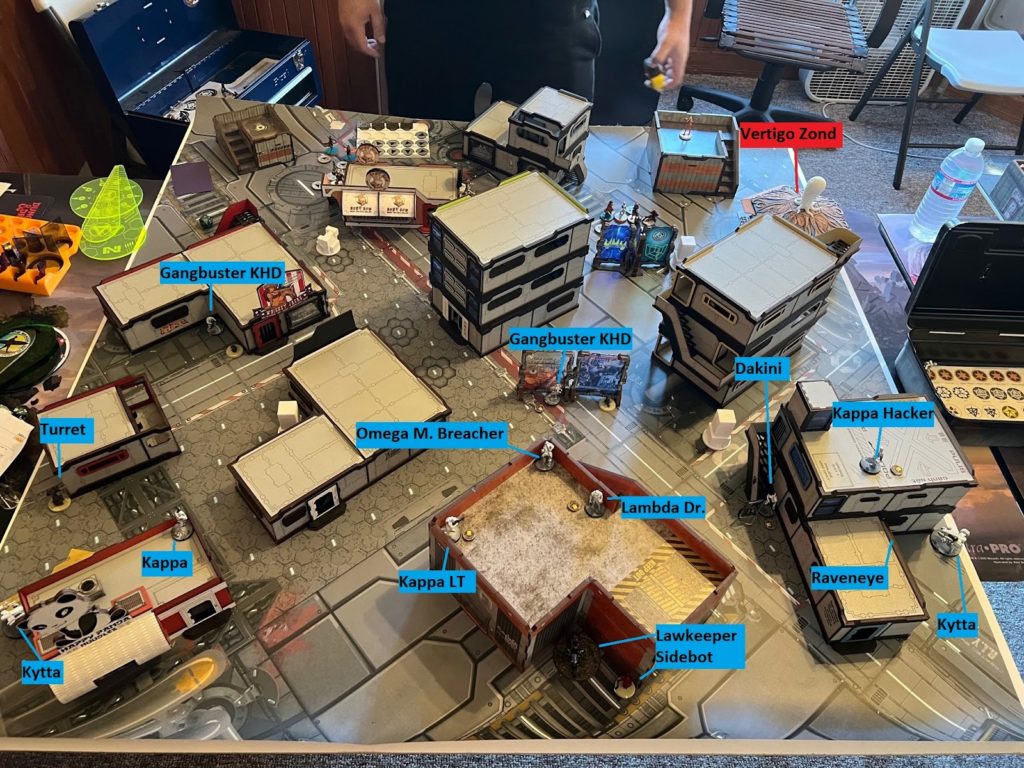
I won the roll and took second deployment on this side. I felt it had better leverage of the long lane across the table and I also liked the approach angles from the two far tech-coffins from this side better. The two Kyttas were on the edges to move up into the front quadrants and provide some ARO’s. I also had the Raveneye tucked back to move forward if needed but largely he’s in the list as a decoy Lt option and to provide some mines for support. The kappa on the roof was there to hack anybody coming for the tech-coffin in this corner, otherwise my plan was to move the kytta’s up and hack through their repeaters. The left Kappa is there for ARO’s, the right as well, but mainly watching for any jump troops who may come down to try and assassinate the Omega. Going second I dropped the lawkeeper far back near my edge to ensure he stayed safe. The gangbusters hung out as close to midfield as they could, ready to jump forward for the coffins. Last but certainly not least, the dakini hid prone at the base of the stairs with easy paths forward to leverage its speed for late-game objective runs.
Bakunin Deployment
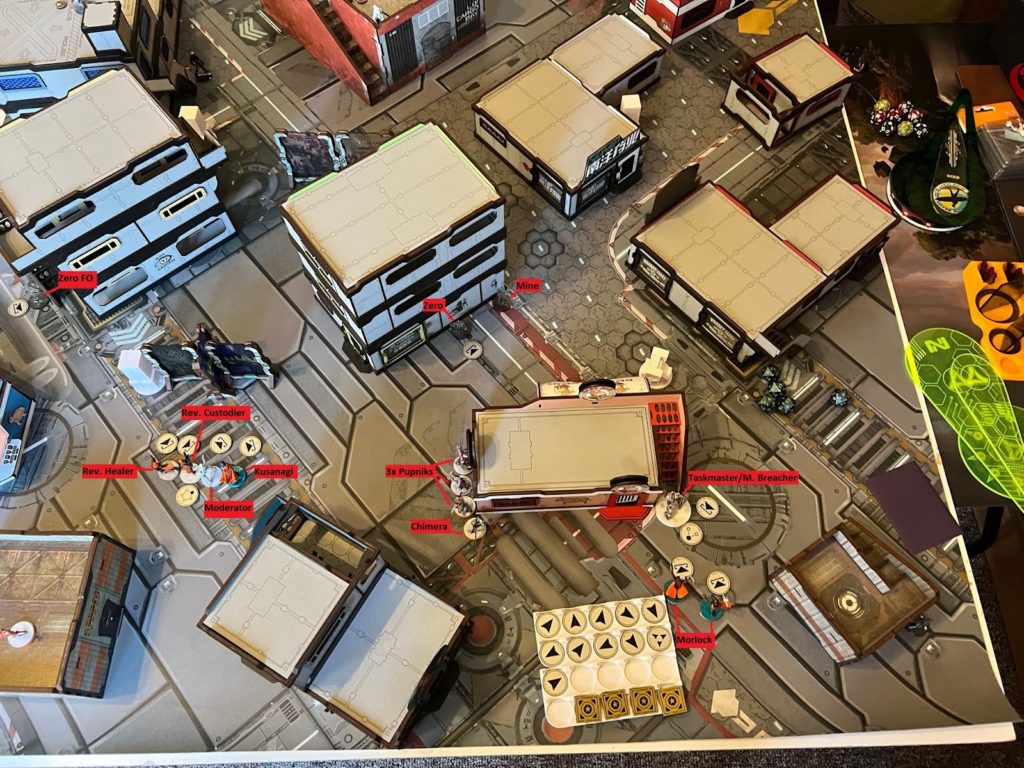
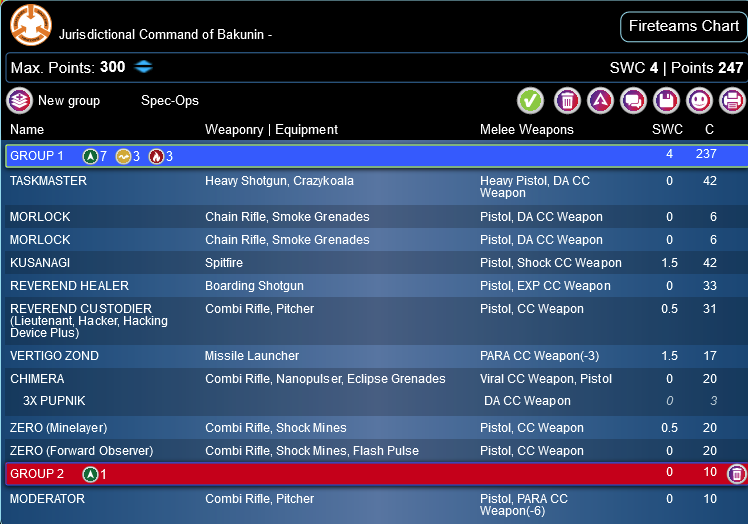
Clint’s list was a pared down version of a 300 pt list he’s been playing so it had a few quirks that come from not being built specifically for 300 points. He dropped the Taskmaster haris on his right side, presumably because he could use smoke to cover the long firelane from the Orange building in my DZ and then leverage their short-range weapons in the killbox where my tablesides tech-coffin was straight ahead of them. The Reverend core went down behind a billboard wall with some flexibility as to which direction they could take. The healer went down within one move of the coffin for an easy open when he needed it. The lone moderator in group two deployed with the core to toss some pitchers as needed. The zeros are infiltrating at midfield to push towards my tech-coffins and the Uberfall were held back in reserve. *Not pictured is his missile bot hiding behind a building on his left table edge.*
Turn 1
Top of 1 – Bakunin
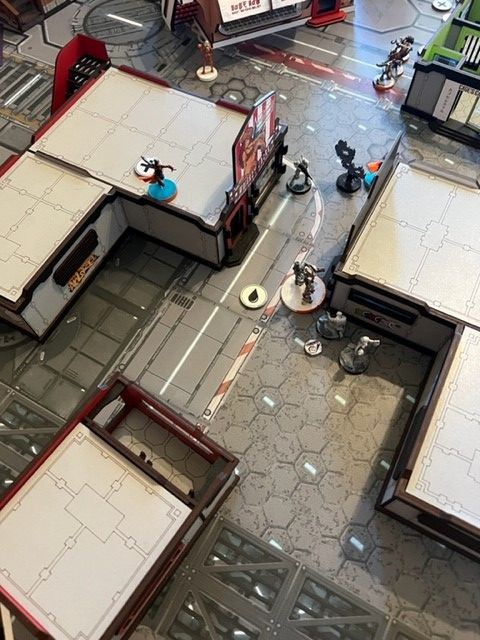
Clint began by bringing his full Uberfall pack up my left side of the board towards the long fire-lane. I tried to oppose his eclipse smoke with a flashpulse but missed and the smoke cut off any real chance I had for ARO’s along that side.To clear the path forward he spent a couple orders moving the Taskmaster haris forward into his closest quadrant and also tripped my madtrap speed bump with a Morlock which failed it’s dodge and got stuck in the goo. Across the board his moderator avoided my Omega’s LoS and attempted to chuck a pitcher to harass my other Gangbuster threatening the midfield. Unfortunately, BS 10 is pretty lousy and he failed the shot. His next move was to go after one of my tech-coffins with his camo token along my right board edge. (He mentioned post-game that he wanted to try and open one of my side’s coffins first because it puts slightly higher odds that an HVT will wind up on his table half.) His camo token move-moved and got discovered to be a Zero F/O by my Kytta watching the flank. It didn’t do much good though as his move took him out of sight and he spent the next order to re-camo. With a couple orders of sneaky moves he revealed to open my tech-coffin which turned out to be empty. For his efforts the Zero got glued down by the gangbuster’s madtrap and spotlit by my rooftop Kappa hacker. In order to safely get to his tech-coffin on the right side the Reverend Core popped out for a long range shot against my Omega. Rather than risk the free shots (even at a -9) I opted to break suppressive fire for the single shot in a good range band. Both our shots missed but his movement had brought the fireteam’s specialist out of line of sight and into contact with the tech coffin. One more order popped it open and revealed it to also be empty. With only two coffins left we knew where the HVT’s had to be and the top of turn one ended.
Bottom of 1 – O-12
Knowing where the HVT’s would be was a nice way to start my first turn but I still had to deal with the problem of the Uberfall in a very threatening position. First was the Lawkeepers impetuous, which I used to dash upfield and put four shots into the glued and targeted Zero to down him. Next up was my Gangbuster that I sent out to peek around a corner at the Chimera and its pups. It was a lousy time for Clint to roll a one on a smoke dodge and fortunately for m me the Chimera went unconscious from a SMG volley. With a healer relatively close I wanted to make sure to put the Uberfall out of the fight so I spent another order to move 4” and blast their corpse off the board. I ran my lawkeeper and his sidebot along with the right side’s gangbuster up the street to discover and take out the second Zero F/O. I lost the sidebot to a mine in the process but it felt like a fair trade to me. With the immediate threat taken care of I turned my attention to the tech coffin and spent a whopping FIVE ORDERS to pry the damn thing open. After all my fumbling with the coffin I was fairly low on orders so I coordinated a few models into suppressive and spent a couple orders to get the Omega into my right quadrant to end the turn.
Turn 2 (1-1 Tie)
Top of 2 – Bakunin
In an effort to deal with my Omega the Custodier from the core shot a pitcher within his ZoC and started raining down the Carbonite to try and brick him. Apparently this Omega happened to work in IT before joining the army though and he passed several reset rolls to burn a bunch of the orders from the pool. As the hacking attacks were coming in, Clint was using the fireteam’s moves to get over to the final tech coffin and take up defensive positions. Unfortunately, one of those move’s got the Custodier within 8” of the gangbuster I had moved up and a trinity ARO popped her brain. With the option to brick down my Master Breacher gone Clint set up his core defensively and knocked the lawkeeper unconscious with Kusanagi.

Bottom of 2 – O-12
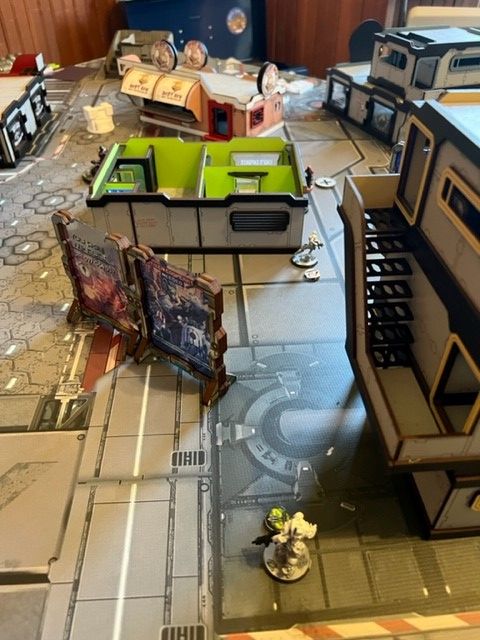
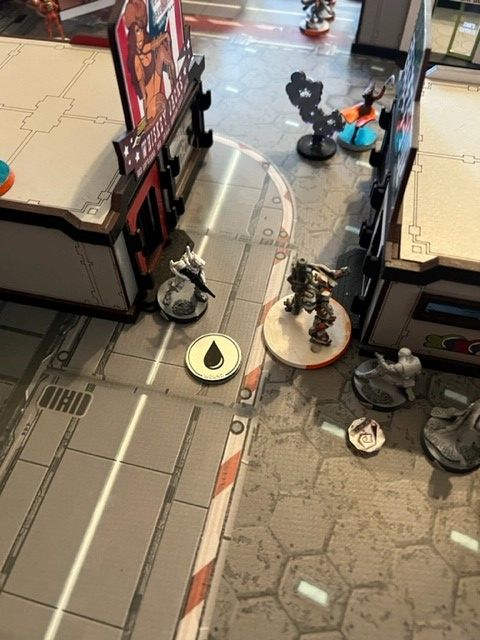
I saw a low percentage but fairly safe play to take out Kusanagi and brought my Crusher down along the far right board edge for a couple Panzerfaust shots at her from cover and out of her good band. Unfortunately the mim-6 was too much to overcome, even without cover; and both rockets missed. Trying another attack vector, I brought the gangbuster around the roofless building pictured above and took on the reverend healer. He got crit on the first shot and dropped. Third time’s the charm for the Omega, who is able to take down the Reverend from long range with his HMG. At this point Clint was out of specialists who could open the last tech coffin but I saw a play to get there with my fast dakini so I spent a few orders to bring him closer for a final run on turn 3.
Turn 3 (2-2 Tie)
Top of 3 – Bakunin
Turns out the Custodier that died in the top of two was Clint’s Lt so he was in LoL but got a lot done regardless. His missile bot used its order to wheel around a corner and take a bad range shot at the crusher who managed to pass a couple saves and only drop to NWI. Through some clever moves with command tokens and breaking the fire team to capitalize on the Morlock’s impetuous order Clint was able to advance the Taskmaster and the Morlock to my nearest tech-coffin, now revealed as my HVT, drop some smoke, and take out the gangbuster protecting it to trim down several points in the quadrant and force me to do some digging to get him out in the bottom of 3.
Bottom of 3 -O-12
First step was to get the far tech coffin open so I can secure the points for opening two. On my way down Firelane Street with my Dakini paramedic I took some shots at the morlock who dropped smoke at his feet to shut down my approach there. With no ARO’s to the Dakini I spent one more order to move up and shoot a medkit into my downed Lawkeeper to get a little faster unit up and to the coffin. He passed and I spent an order jetting up and prying open the box while Kusanagi promptly cut him back down again with an ARO. With two coffins open I’ve got to get the taskmaster down in order to secure this win but without a ton of orders to get it done. I tried a coordinated order of the Omega, Dakini, Kappa, and Kytta to get the Omega over and into the quadrant and take a couple shots at the Taskmaster with the Kappa on the roof and the flash pulse bot. I managed to put a wound on him but missed with the flash pulse. He failed guts and ducked behind the corner to close my attack vectors from the models near my DZ. At this point I only had the orders for one play so I took the dakini for a walk past the Morlock in his own smoke and set him up for one last shot. With the last order of the game I popped the dakini out of smoke to put three combi shots into the back arc of the Taskmaster to down him.
Post Game Analysis (O-12 win 7-6)
O-12: +2 for two coffins, +2 dominate quadrant with HVT(mine), +3 game rounds with dominant Master Breacher.
Bakunin: +2 for two coffins, +2 dominate quadrant with HVT(his), +2 game rounds with dominant Master Breacher.
This was a weird mission, with a lot going on and it took a lot of thinking to come up with the best play to keep me in position to score the most points. I think the trickiest thing about the mission was just how much of a swing there was from me taking out the taskmaster. If Clint had made those last armor saves the mission would have wound up being a 10-4 loss for me.
I had spent a command token before the game to start the Omega in suppressive but I don’t think it was worth it on this table. My thinking was that the taskmaster team would advance through smoke so it wasn’t worth trying to hit them and if the Reverends came forward I’d be able to get them just inside the 24” band. Clint made a good point post-game though that as the active player he has too many options to ensure that my Omega isn’t in a good spot to suppress. In this case, he moved back into his deployment zone before popping out to ensure we were out of 24” and I was forced to break suppressive fire with my first ARO to make it face to face. If we were to play this game again I’d stick with my usual choice of stripping two orders. Especially when I know the opponent’s army pretty well and am sure there’s no counterintelligence.
I wish I had spent an order or two on the lawkeeper in turn one to retreat him back to a safer place; especially with the two tech coffins on my right side being opened in Clint’s first turn I should have anticipated the Revered team coming over and threatening that space. Also, I should have probably brought the crusher down on the other table edge (the left one) to get some more mileage out of his BSG. As it stood I had two shots on a 9 against Kusanagi’s dodge and once the panzerfaust was empty I didn’t have much in the way of targets on the right side. As a F/O too the Crusher could have been an option to open that box instead of needing to pull the medkit shot to suicide bike attempt at it. I probably should have been more aggressive with my Omega as well. As the Master Breacher I wanted to be sure I kept him alive but I had both a doctor and a paramedic to support him on top of his Mim-6 and two wounds. There were a couple firefights where I tried to use a less durable piece like a Gangbuster instead of pouring orders into the main attack piece of the list and letting him do his job. All good lessons to keep in mind as I finally bring this force up to 300 points next week.
Pingback: Mission 049 Report: Different Point Values – Bromad Academy